Three Indian Block Printed Leaves

I mentioned recently that I’d attended another Adult Learning course covering Indian Block Printing & Stitching, but hadn’t shared much of that here just yet. Not wanting to tease you I thought I should share some of that now that I’ve mentioned it, though there’s much more to come on this craft as this is the one I’m finding the most addictive so far. There’s so many possibilities, especially if I combine this with my newly found pouch-making skills!

But let’s not get ahead of ourselves!

I’ll share more about the course and its format in a future post, here I want to focus on a completed piece - or almost completed piece…

How it started…

It started quite simply, using old bedding as my background material. This was from the box-pleated ‘frill’ of an old valance sheet which I cut off and edged using my overlocker. I ironed it too - there was a lot of it, though it was much easier to iron now that it wasn’t attached to the central section which goes under the mattress! We’d not used the valance sheet for many years as not only was it hard to iron, it was also tricky to manoeuvre under the mattress and well, life’s too short for all that.

I printed the designs onto the fabric using fabric and Indian blocks at the adult learning class - and as you can see used the same block to create the design of three leaves. I also experimented with using two colour fabric paints on the middle block, adding an almost fluorescent yellow to the shimmering green, which I used on the outer leaves.

Three leaves block printed onto a piece of old bedding - two with the point down and a third between them with the point up

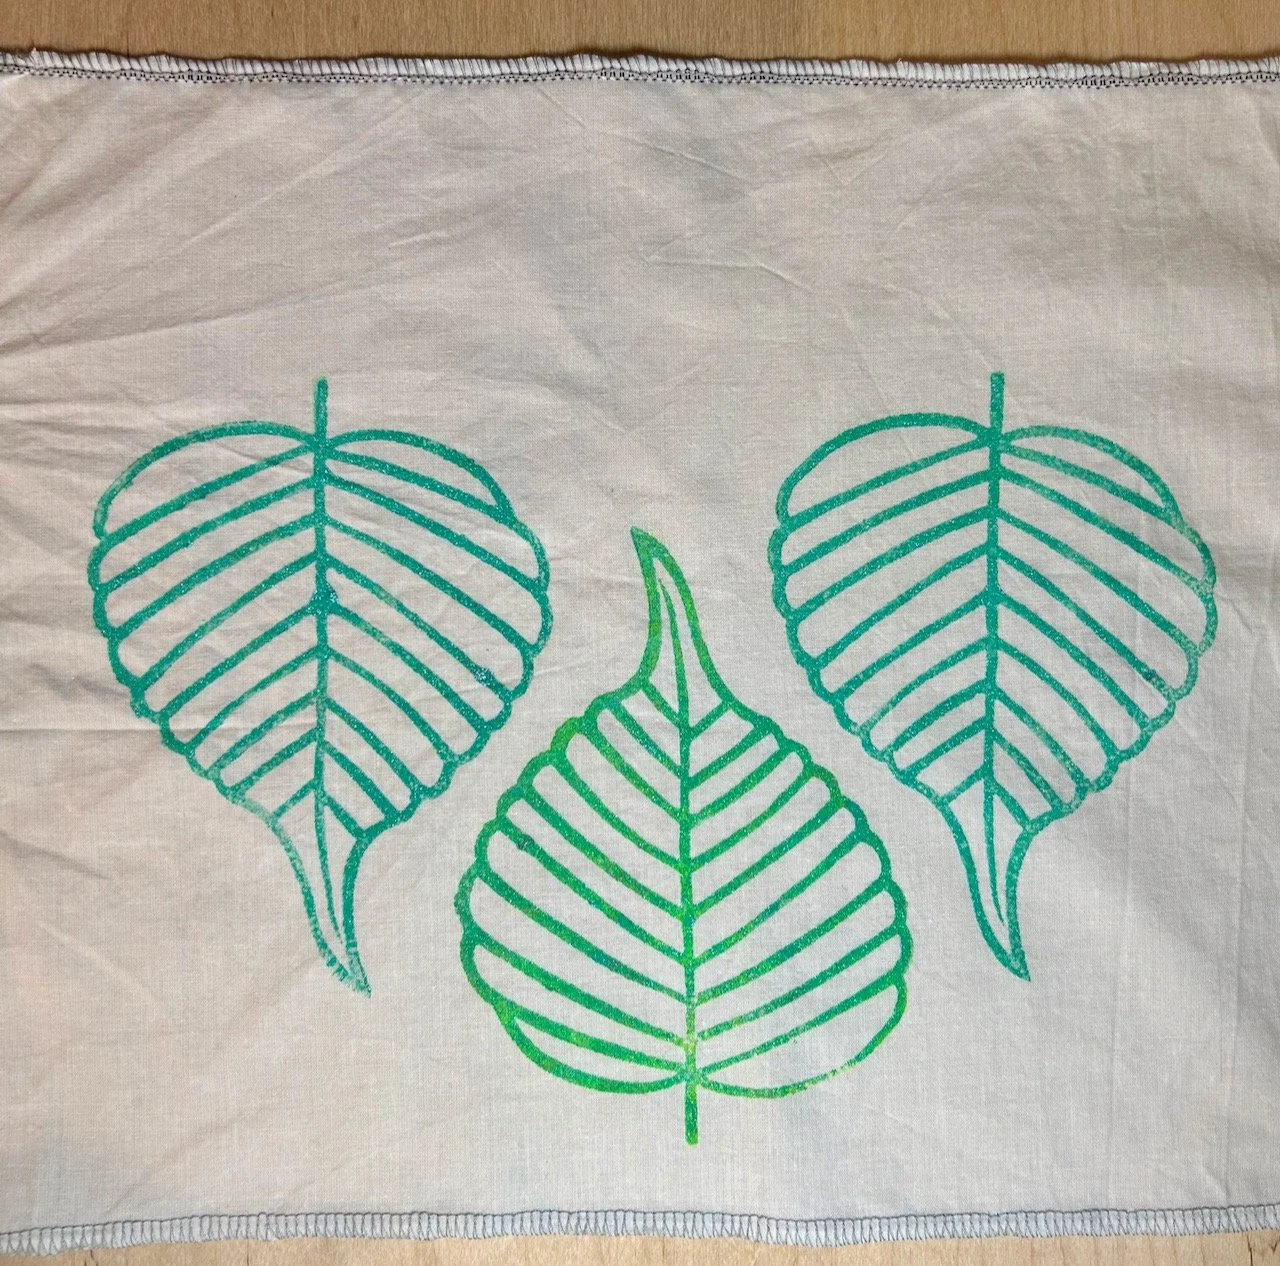
I liked this as a design and the resulting print, though the leaves kept reminding me of onions for some reason, and I’ve no idea why. Having rediscovered the joys of chain stitch as part of this course I was keen to continue that, and decided to outline the leaves and then fill in the blanks, but keeping the central design different.

I wanted to keep the green and green/yellow outline, and I wanted the central design to be prominent. Looking through my threads I opted for browns through to blush pink for the outer leaves and for oranges through to yellow for the central motif - the colours just seemed right.

All three motifs outlined and filled with chain stitches in neutral colours for the two outside leaves and warm oranges and yellows for the middle motif

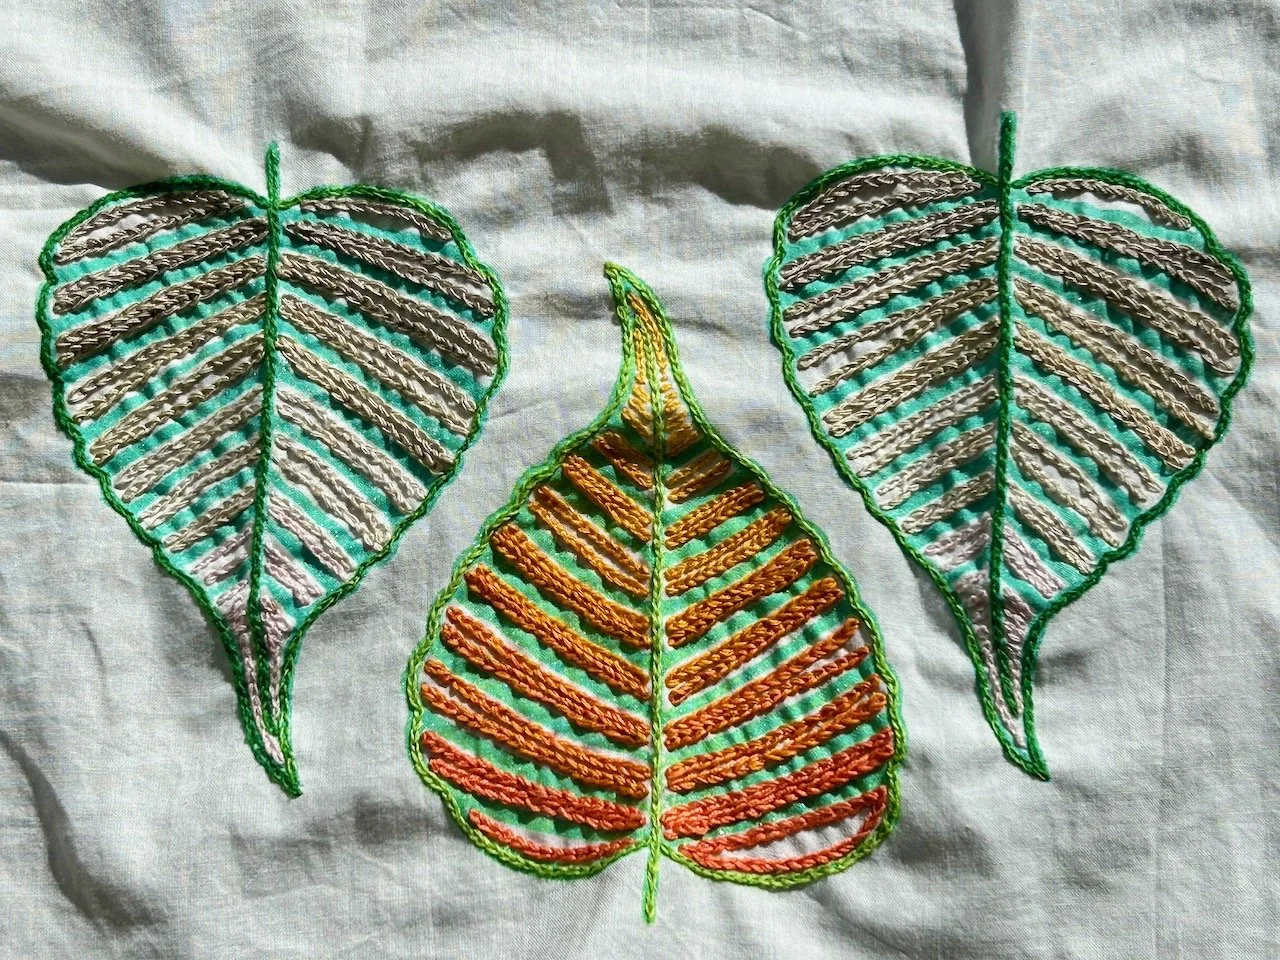
Stitching was surprisingly addictive, and quick. It seems I didn’t stop and take many photos of the in-between stages, but if you look at the middle leaf that’s edged with a lime green thread, rather than the darker green used on the outer two.

I also made it up as I went along, mixing and matching strands of my threads to help ease the colour progression, and I’m really pleased with how this turned out.

So then I decided to add some beads.

Just tiny little ones.

In some of the gaps.

The same three leaves, now with added beads in some of the gaps - the beads follow the colours of the threads

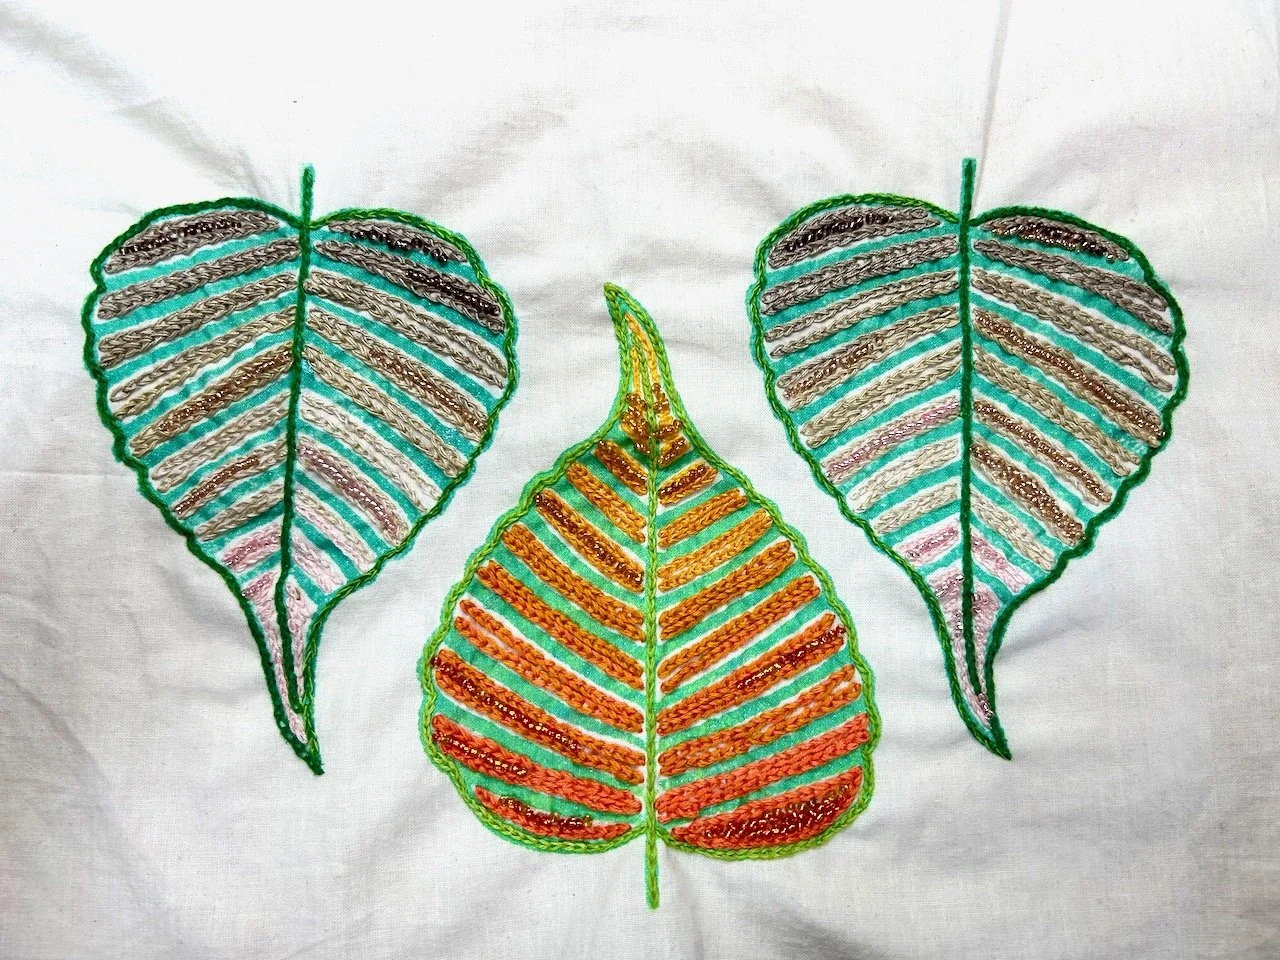
Again allowing my creativity to lead.

It’s quite different to how it started isn’t it?

The embroidery is done, but this piece isn’t yet fully completed as I want to incorporate it into a pouch somehow - I’m just not sure how, just yet but I’m sure I’ll know in the not too distant future. For now I’m enjoying this unique piece which I’ve created without knowing where I’d end up.

PostCommentLove

A pincushion and two pouches for starters

My journey with the Adult Learning classes here in Newark continues, I’m currently attending the Machine Sewing for Beginners class for bags, and while I’m not a beginner with my sewing machine, I am new to bags. I also want to up my skill levels on putting in zips and buttonholes and as both of these are covered in the 6 week course, and knowing how good the courses I’ve been on so far have been, I signed myself up.

This is actually my third course - I started with the Gelli Plate Printing class and then quickly followed that with an Indian Block Printing and Stitch course, which was amazing and I’m hooked on printing onto fabric. I’ve not shared much of that yet, and none here though you may have seen some on my Instagram feed and stories, but I have so much to share from that one, so keep an eye out for that.

The bag making class is small - there’s just five of us and the tutor, and the skill level is mixed which is something I anticipated when I signed up. However there is still much to learn, especially as I’m using a machine provided by the course which is a newer model than mine and has a top loading bobbin which I’d not seen before, and it’s also nice to spend time with other people doing the same thing.

It’s also been hands-on too, some theory obviously, but not overly so. In fact the first week we all left having made a pincushion, so that was nice. As I wasn’t sure what it’d be like or what we would start with, I decided to take along fabric that wasn’t at the top of my favourites list, and that which I’d probably not rush to use.

And so that first week I made a Christmas pincushion, like you do!

A light grey square fabric pincushion, the material has snowflakes arrows and reindeers in red, green and brown line drawings - and there's a large red button at the centre

I’d misjudged the seam allowance on the new-to-me machine and only realised once I’d turned the pincushion the right way through, which meant that hand sewing the closure was more tricky than it needed to be and therefore it wasn’t as neat as it could have been.

That annoyed me in a minor way, but later on I realised that I could pimp up my pin cushion and make it even more Christmassy by adding a simple red and white twine around the edge. The ‘twine’ I used is actually paper (but quite solid) which I’d saved from Christmas presents last year!

the same pincushion as the previous photo, now with orange and green pins pressed into the top and a red and white trimming around the seamed edge

There was nothing wrong with it before, but I’m much happier with it now!

Next up it was a simple pouch, and for this we needed two pieces of material - outer material and lining - approximately the size of an A4 sheet of paper. While I had my B team material to choose from, I also had something else in mind. It was a bit smaller than needed but as this sort of pouch can be flexible on size I decided to go for it, and left with this completed pouch.

A cream pouch with black and white printed detail and a purple popper

I’ve not made anything like this for a long time, and this was easier than I remembered. As the tutor said she’s a big fan of straight line sewing, and this is mostly that - and the purple popper sets it off nicely too, and complements the purple batik lining (which was firmly in my B team fabric list).

There was one part that I wasn’t entirely happy with (again) - if you look in the bottom left hand corner you can see the sewing is a bit wild where I started off and revved the machine a little too much and off it went! It was a shame it was on the plain background of the material, had it been on the other side in the pattern I don’t think I’d have noticed it quite so much.

But I wasn’t undoing it, this was a practice pouch and it still worked perfectly well.

Then I realised I had some ribbon that was very similar to the background colour, so I dug that out and added an embellishment in that corner, front and back.

The opened pouch showing purple batik lining, and the addition of a toning trim in the bottom left hand corner

Now it looks as if it was always meant to be there, and I’m much, much happier.

I also got to start another similar but different pouch - one that’s ideal for sunglasses, and as I didn’t have sunglasses case it was perfect for me. I choose A team material for the outside, and again B team material for the lining. There’s nothing wrong with the lining material, but I think a lot of what I’m calling my B team materials just look better in small doses!

The same pouch as the photo above, this time with the flap open to show the lining - navy with a green/blue and white/brown checked design

The outer material reminds me of Portuguese tiles, and the lining of a man’s shirt from the 1970s!

And for a change this one hasn’t been pimped up, I finished it in the third week of the course just as the sun decided to make an appearance (at last!) - so I couldn’t have timed it better!

Using my Gelli Prints

While creating the gelli prints is good fun, and slightly addictive, I knew that I needed to actually use them or otherwise you’d find me under several reams of them, and before long I’d probably need rescuing! The last class on the course was all about turning these wondrous prints into even more wondrous hand crafted items, and I left with quite a bundle of handmade items, some of which I probably wouldn’t have thought of or tried at home:

Using the gelli prints on (clockwise) a handmade notebook, a card and two bookmarks

A HANDMADE NOTEBOOK, A CARD AND TWO BOOKMARKS - THE GELLI PRINT WAY!

Though I was rather pleased with them, and I’m already using the bookmark with the orange tag in my book - and in case you’re wondering the orange tag is repurposed from a Superdry tag. I can definitely see that I’ll be using scraps of gelli printing alongside many other items I’ve saved for crafting - and I’m already wondering how small is too small for saving these scraps!

But anyway, inspired by the series of four classes I took in Newark and knowing that if I just put this to one side it would probably stay there for a while, I wanted to set about creating some more cards. I’d already toyed with strips of gelli printing and liked that so wanted to try blocks as backgrounds, with a design on top.

SIX pink/peach gelli print blocks with a gold and black floral design over the top on a white background

Both of these cards use the same concept but have turned out very different - and I like them both. I used a stencil for the outline of the floral and meadow designs and then adapted these, so they’re less stencil-like, using my knowledge of plants and flowers.

Six pink, white and blue gelli plate blocks arranged on a blue card with a meadow scene in black and highlights with pink and blue on top

And didn’t they work out well?

I wanted to try using some of the smaller scraps, and so that’s where gift tags came in. I think these were also successful and I used some scrap ribbon on both, and those black diagonal stripes - well they’re old dymo tape that I found in one of my many craft room boxes.

Two gift tags using scraps of gelli printing, some ribbon and washi tape (on the left hand tag) and dymo tape on the right

These three gift tags were originally intended as a card, however I realised my knowledge of birds is lacking and one (now cut out and discarded) wasn’t right at all. Not wanting to lose all of my work I repurposed these further making gift tags and adding ribbon saved from Christmas crackers many years ago as ties - and I’m not sure you’d know if I’d not told you.

A gift tag to complement the card - both use green, yellow and orange gelli printing.  The card also has scraps of ribbon and paper, a strip of map and a button

My final make was again to avoid throwing away small scraps leftover from the card - and another gift tag. I think I could quite get into having coordinating cards and gift tags, though I’m not sure anyone other than me would notice!

I just know that there’s so many more uses for all of the gelli printing I already have, let alone the ones I’ve yet to print. I’m also pretty sure that this new craft is here to stay!

PostCommentLove