The Path of Renewal

* I was invited to the press preview for and provided with a pair of tickets to Gardeners’ World Live so I’m marking posts from the show as 'Ad’ - as usual my views and opinions are very much my own. Be sure to check out all of my posts from the show.

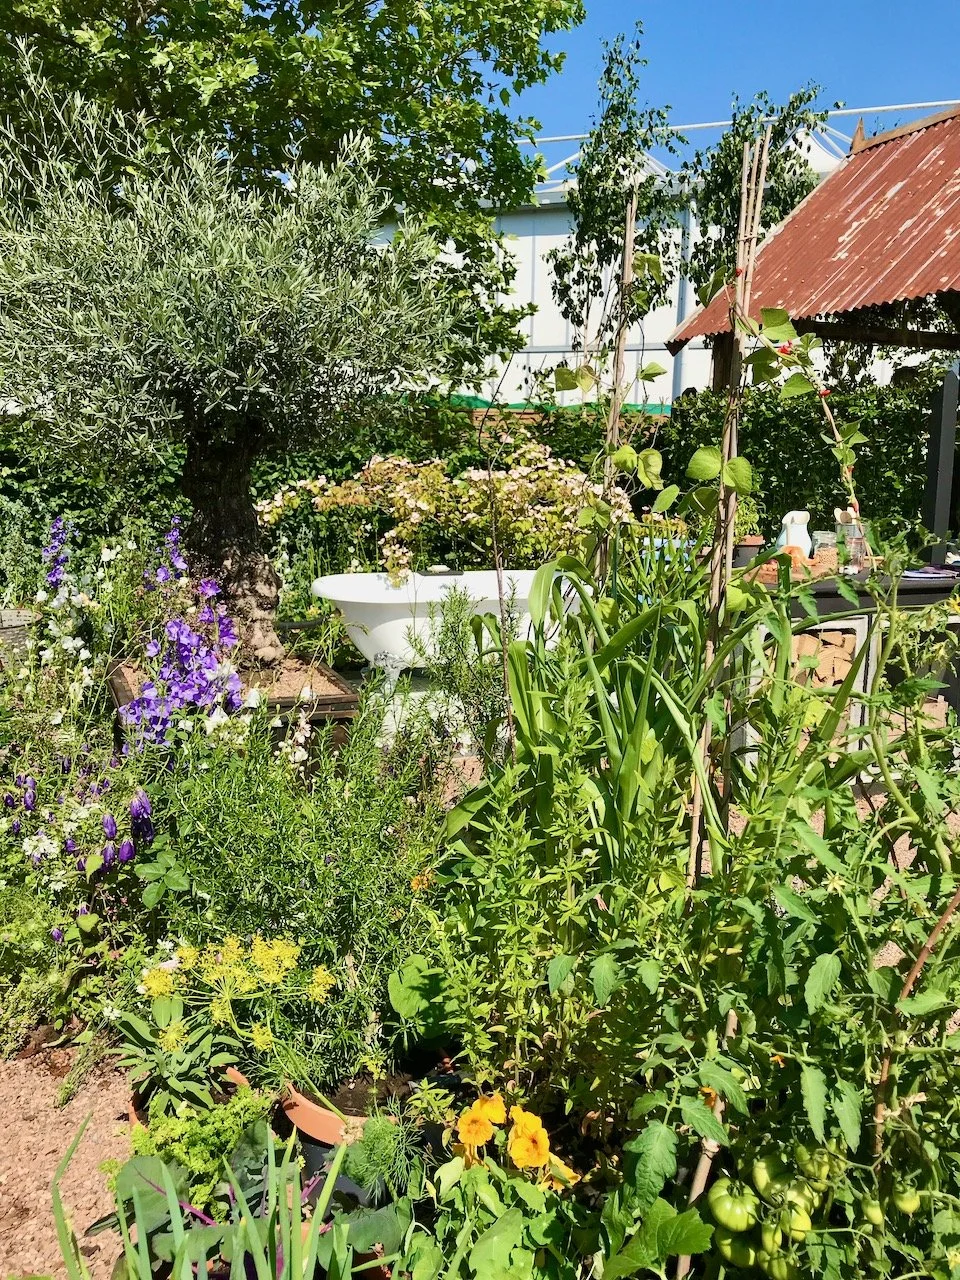
One of my favourite show gardens was this one designed by David Negus which had the main aim of ‘challenging people’s perspectives on materials’ as well as to ‘inspire them to see the potential for reuse and repurposing by showcasing the beauty and benefits of reusing items’. The garden does indeed provide a visually stunning backdrop for the plants - as planned - but also provides spaces for wildlife too.

Scaffold planks stacked horizontally and vertically to provide structure to the edge of the seating area - the seat itself looks like an old radiator on top of scaffold poles.  Sleepers are used to frame the decking area h

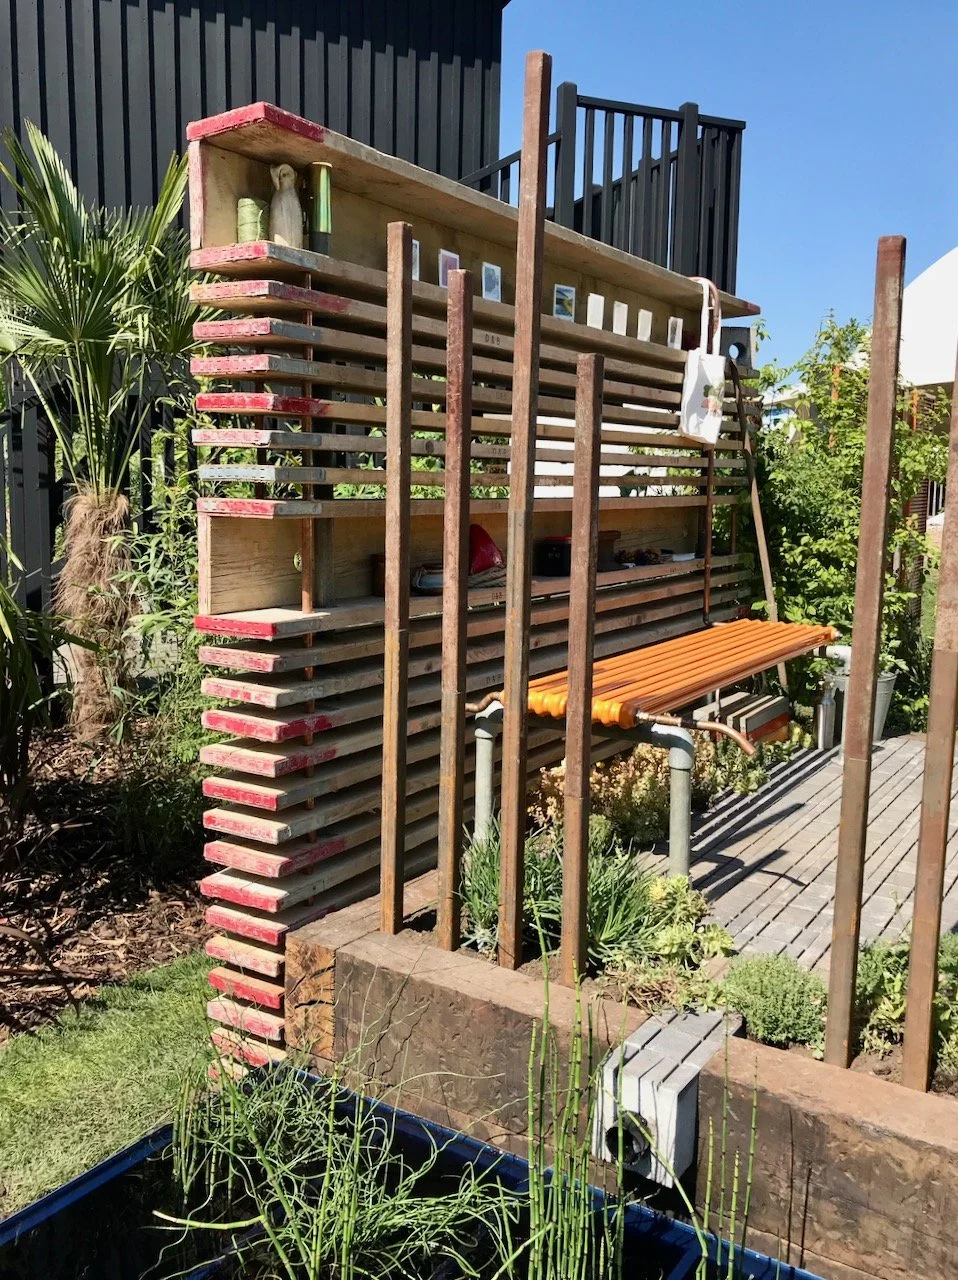
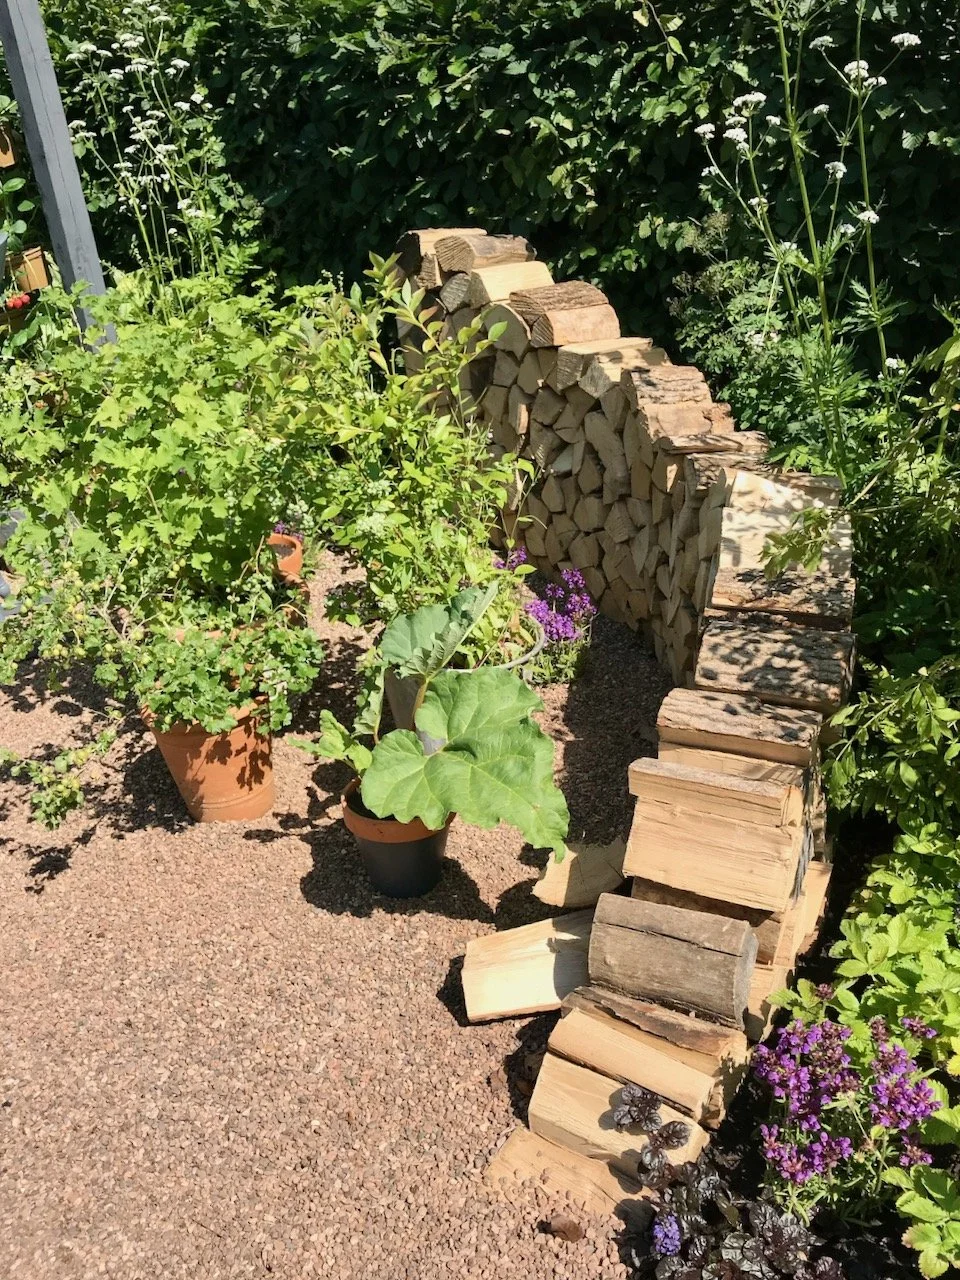
For me it was this scaffold plank structure that caught my eye as a clever way of adding something that would give height and structure throughout the year. I loved the detail of turning some planks vertical provided a nook for all sorts of paraphernalia, but mostly because every garden needs somewhere to put your cuppa, doesn’t it?

I’ll admit though I was less keen about it being full of bugs and spiders, though I can see their attraction in such a space!

Wooden uprights of varying heights in the foreground, the borders and decking are behind

What this garden did help highlight for me is that gardens need height. And that doesn’t always need to come from plants. While we won’t be adding anything as near as grand as the scaffold plank shelving to our garden, I think we will be adding something with height - partly for privacy, but also for interest. These simple uprights above show it doesn’t have to be something elaborate, which is food for thought indeed.

A red workman's stop sign bottom right, the light stone path above edges the beds edged with sleepers and iron railway parts

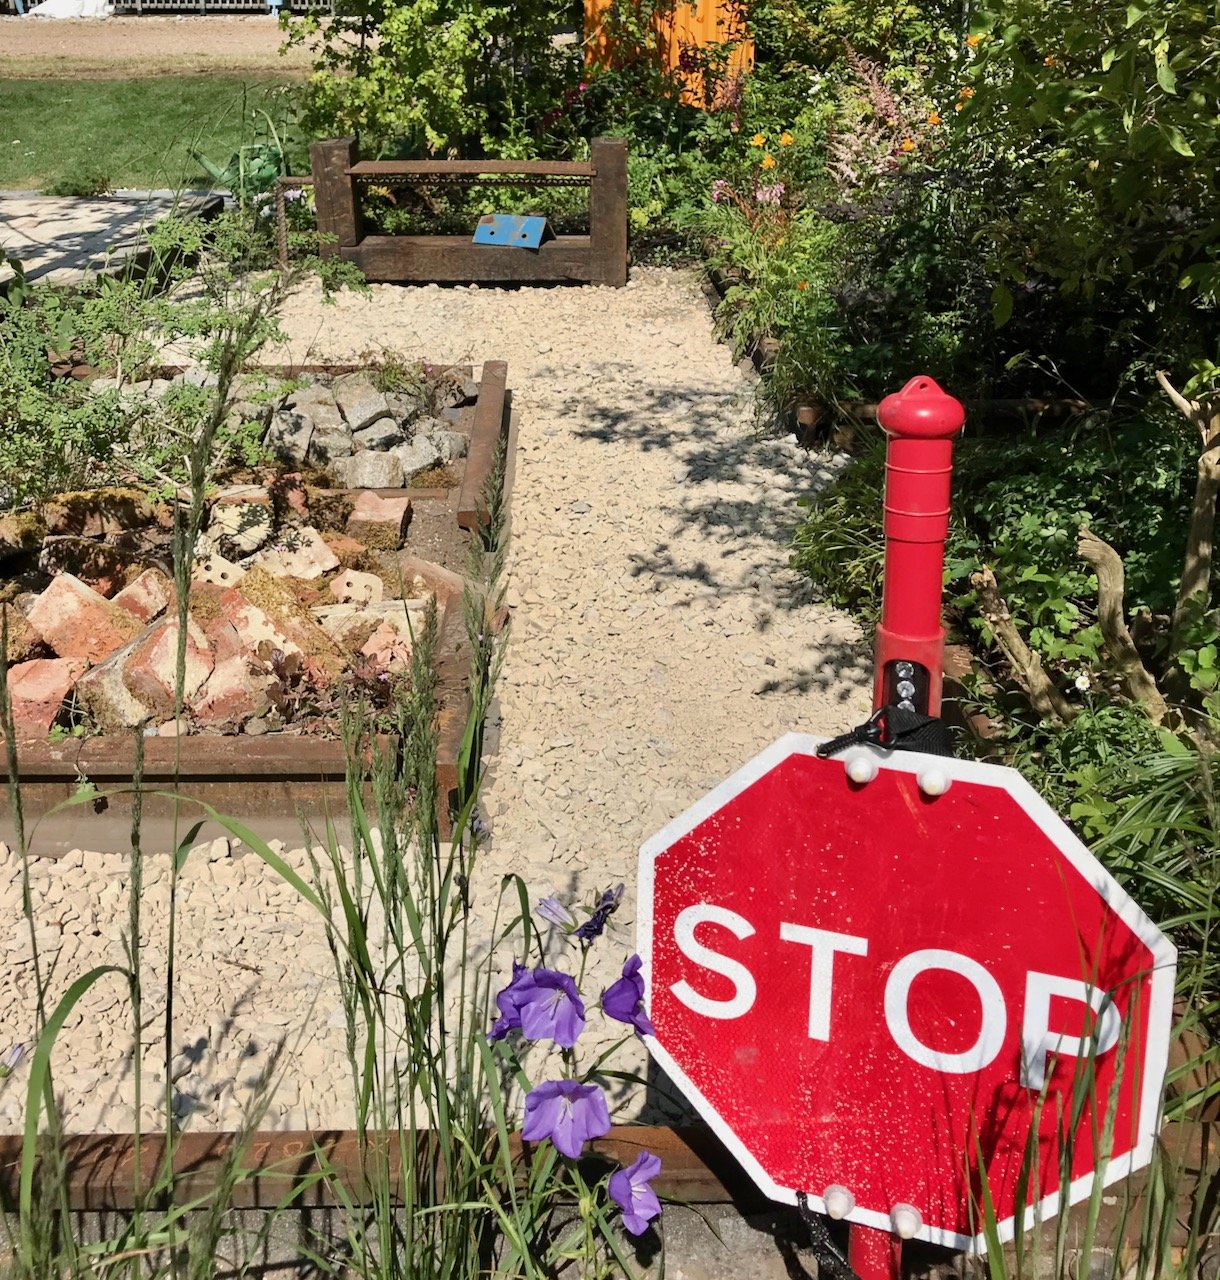
The STOP sign made me smile, as I’m also quite partial to a sign in my garden - though my ‘pool’ sign hasn’t yet found itself a new home here, yet!

A wider angle of the same garden showing the paths, borders and decking area - with the scaffold plank structure in the background

It still blows my mind at how much is achieved by those that build these gardens in such a short space of time, and how ‘at home’ every garden looks too. And then after the show, it’s taken away again though often the gardens find new homes in alternative locations, so very little is wasted.

It’s bonkers though when you think of it like that, but I’m actually glad that it happens and that I’ve been fortunate enough to see many inspirational gardens like this one first-hand.

* With thanks to Gardeners’ World for inviting me to Gardeners’ World Live, it was as fabulous as ever!

Industrial open shelving in our pantry and utility room

Coming from a house which had neither a pantry nor a utility room it was exciting (in a domestic kind of way) to have these spaces in our new house. Both spaces had room for, and needed more storage - the pantry especially, which was essentially a large walk in cupboard. We knew soon after we viewed our new build barn that we wanted something that stood out, but was also functional too, and we quite quickly settled on the idea of pipe shelving.

I’d seen a few companies selling shelving that could work, but in the end settled on the Acumen Collection for custom-sized shelving. We also looked at buying the components separately, but decided against that because we could get what we needed for our spaces from a single supplier, which worked better for us - and it also meant that someone used to supplying these checked over our design.

As you’ll know by now I do like a plan, and this was the plan for one of the custom units we sent over for viability checking:

A handdrawn plan of the custom sized shelving unit for the back wall of the pantry

Thankfully this, and the smaller custom sized unit for the pantry came back with top marks, and it wasn’t long before we placed our order. They took a good couple of months to be made and be delivered, and when they did we were stepping over multiple boxes as we’d ordered a lot of shelves. But once they were here we were keen to get started, or rather I was keen for MOH to get started!

Since we moved in we’d used the dresser we’d had in our conservatory and a couple of bookcases as impromptu food storage, and while it worked as a temporary measure it made our kitchen diner feel more cluttered than it needed to be, and remembering exactly where I’d put things was becoming a challenge.

These are the shelves that tested the patience of a very patient MOH, and given this I was so glad we didn’t opt to source the components ourselves - though now the shelves are completed if we were to do this again, I would seriously consider doing that. But as a first-timer, probably not!

They’re heavy, and tall so had to be built in-situ - and MOH soon (mostly) got the knack of putting them together with a few swear words thrown in occasionally, as is the way with DIY.

They’re up, and they’re fantastic, and we even got them up in time for Christmas so that we could get a bit more sorted before we hosted Christmas in our new house.

A five shelf three pipe open shelving unit with scaffolding boards at the end of the room, with a smaller shelving unit at right angles on the left hand side.  An old enamel bread bin takes pride of place on the shelf, the rest of which are empty

A PLACE FOR BREAD IN THE PANTRY

And of course when they first went up it was all a bit daunting - what should go where and so on. One thing I knew was that I wanted my new-to-me enamel bread bin to have pride of place, and so that was the first thing on the shelves. Thankfully it just about fits with the lid on, and instead of bread it houses my pasta. Obviously.

Gradually the shelves started to fill up - tins below the enamelled bread bin, along with a cheese dish and a basket and tin on the shelf above

GRADUALLY FILLING UP…

A fully loaded pantry - baskets which I used in my old kitchen cupboards being reused and items we use the most within easy reach

… AND FULLY LOADED

My aim was to have a mix of practical and pretty, while having the things we used the most within easy reach - and so that meant breakfast things at eye level on the smaller unit, and interspersing the pretty items - the cheese dome, the enamelled bread bin. I reused the baskets I’d used in cupboards in our previous kitchen, hunting around the house as some had been redeployed following our move - and I think the symmetry of the baskets helps bring some order to what could be a jumble of a space.

I always planned to incorporate our old wine rack at the bottom of the unit, and this was easier said than done. The wine rack didn’t want to play ball, it wasn’t square and no matter how much MOH shaved off it still needed more. We got there in the end, but it took a while as obviously MOH didn’t want to take too much off.

At Christmas we added a small fold up table specifically for the Christmas Cake!

ADDING SOME ADDITIONAL POP UP STORAGE

It’s through using a space that you learn what works and what doesn’t. I knew that over Christmas I wanted some more surface space in here, and then I remembered my wooden fold up table which used to hold my sewing machine. That hadn’t been used since we moved and was just the right size for what I had in mind - a space for the Christmas cake!

It worked so well as a temporary solution that the table now lives in the pantry behind the door, along with the new step stool I bought so that it’s easy to reach things on the top shelf. That means I’ve needed to revise my plans for shelves behind the door, which MOH is pleased about as I now want about half the shelves I previously did!

THE NEXT SHELVING PROJECT

Here, at some point in the Year of the Shelves, I’ll have shelves from just above where the table is for spices and random cans of drinks which will tidy up this part of the pantry no end - I can’t wait - we have the wood, so I’m hopeful it won’t be too long…

A similar approach in the Utility room

We opted for the same style shelving units in the utility room to provide consistency, and because we liked them! Here though we were able to choose one of the standard sized units with six shelves. In the end we only put up five of them as while there was space I actually don’t think it needed it.

This is also fits the pretty and functional brief - and has spaces for candles, wax melts and their associated paraphernalia, batteries, our medical kit, flower arranging supplies including vases, shoe cleaning stuff, table linen, light bulbs and my lovely new(ish) preserving pan.

A five shelf 3 pipe open shelving unit in the utility room for other household items including vases, candles, tablelinen, shoe cleaning stuff, batteries and more

It holds a lot of stuff but still manages to look organised and not too arranged! And in case you’re wondering the light bulbs are in one of the large baskets on the bottom, again previously used in our old kitchen and repurposed for our new space; the batteries are in a wooden wine box next to the new medical supplies tin. And apart from that tin and the preserving pan, everything else we had in our old house, where mostly they were in cupboards either in the kitchen or elsewhere in the house.

I wasn’t sure if either space would stay so tidy, but they have - thankfully, and even more so now I’m (domestically) excited about having these spaces in our new house!

PostCommentLove

The Newson Health Menopause Garden

* I was invited to the press preview for and provided with a pair of tickets to Gardeners’ World Live so I’m marking posts from the show as 'Ad’ - as usual my views and opinions are very much my own. Be sure to check out all of my posts from the show.

This garden was to empower visitors to the garden to feel empowered to start conversations about their health, and get inclusive and accessible perimenopause and menopause support. And you may automatically assume it’s a space for women, but as Dr Louise Newson said at the Best in Show Awards, which took place after the press preview, menopause is something which directly affects 51% of the population, and 49% of the population indirectly.

Entering the garden encouraged in by log piles stacked to form a curve

She also said while she is a menopause expert she wasn’t a gardener, but had worked with Ruth Gwynn who was an extremely talented garden designer as evidenced by these photos.

The garden is designed to be a place to relax and reflects ways of relieving symptoms of the menopause, and importantly it is also affordable and achievable, and can be done without overwhelm.

Two wooden rocking chairs painted grey set on gravel in front of the border

The plants were selected to create a visually enriching yet calm atmosphere, and during the show it held talks around relaxation, yoga and nutrition as well as having clinicians and experts on hand with information and advice for those visiting.

Stacked logs acting as both a border edging and bug hotel, in front gravel and baskets of logs, behind a colourful flowering wild border

The show stopper for this garden was the standalone bath tub with the scented rose bush behind. It was especially appealing on the very warm afternoon we visited, and we weren’t the only ones eyeing it up!

The whole space was incredibly calming, and it was great to see this space at the press preview as I’m sure it would have been a really popular garden at the show. It was also a great way to further raise the awareness of this subject in a non-controversial, practical and inclusive way. It was also a very worthy winner of its platinum and Best Show Garden awards.

* With thanks to Gardeners’ World for inviting me to Gardeners’ World Live, it was as fabulous as ever!